Once you’ve created a stage, you can add graphics (backdrops, avatars and props), audio and video files that you want to use in your performance. This chapter explains how to assign media items that have already been uploaded to UpStage to your stage. For information about creating and uploading media, see the Media Management section.
Assign media to a stage
Graphics and audio files that have been uploaded to UpStage can be assigned to specific stages, making those media items available to be used in performances on those stage. A media item can be assigned to, and used on, multiple stages at the same time.
You can assign media to a stage from either the Stage Management interface, or the Studio’s Media interface. Here we will explain the Stage Management interface method. Visit the chapter Assign media to your stage in the Media section of this manual, for the Media Management interface method.
In the Studio, click on “Stages” in the left-hand navigation menu and find the stage you want to assign media to in the list of stages. You must be the owner of a stage, or have been given edit access to a stage, to be able to assign media to that stage.
Click on the “Manage” button to enter the Stage Management interface for your stage.
In the left-hand menu of Stage Management, click on Media. You’ll see two columns: “Available Media” and “Media assigned to this stage”.
“Available Media” by default shows media uploaded by you. Use the drop-down menus at the top of the column to display media uploaded by a different player, or by all players, and use the search box to search for a specific media item. In the left-hand menu, you can select a specific media type, e.g. ‘Avatar’, ‘Curtain’, etc., in order to further narrow the display and find the media item you’re looking for.
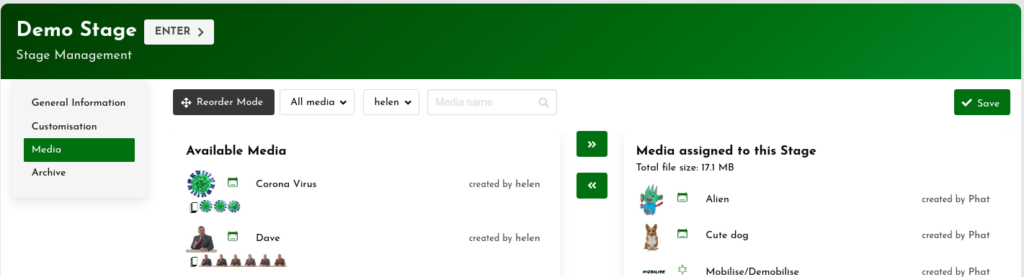
The column “Media assigned to this stage” shows any media that has already been assigned to the stage. If you’ve selected a media type and/or player to filter the display by, it will show only the media of that type or uploaded by that player, which has been assigned to the stage.
Here you can also see the total file size for the stage: this is the combined weight of all the media files assigned to the stage, and is an indication of how long the stage will take to load. The higher the file size, the longer it will take to load.
Move the cursor over the media item you want to assign to this stage; it will be covered with a green overlay and a white + sign. Click on it, and it will move from the Available Media list to the Selected Media list.
Once you’ve selected all the media you want on your stage, you must click the green “Save” button at the top right, to save the changes you’ve made. The selected media will now be available for you to use on the live stage.
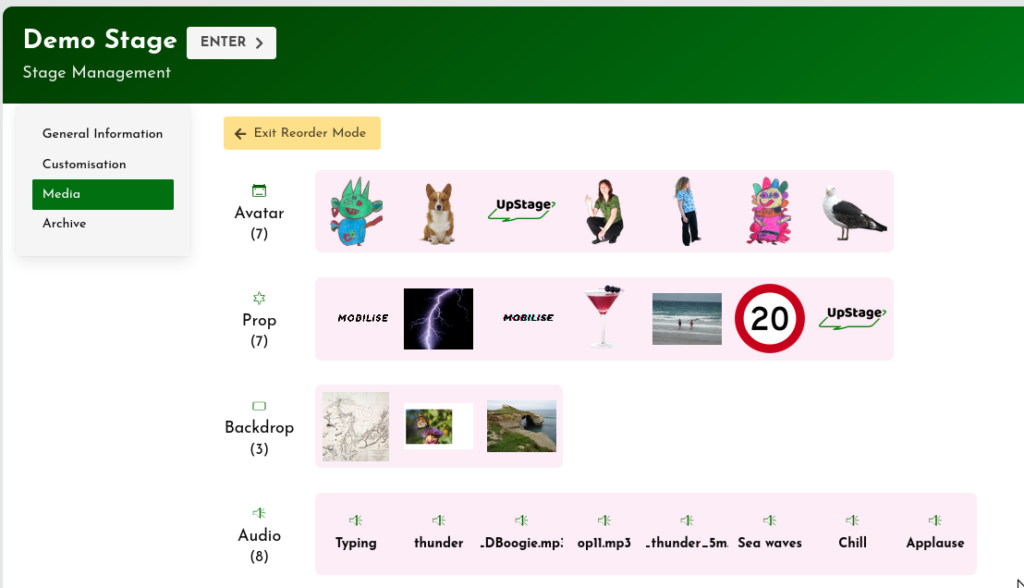
Reorder Mode
The Reorder Mode allows you to determine the order of the media thumbnails in the on-stage toolbars. This can be helpful if you have a lot of media on your stage, or need to be able to quickly move from one to another.
Click on the “Reorder Mode” button, and the display will change to show only the media that is assigned to the stage, grouped according to media type.
Drag and drop the thumbnails to the order that you want. When you have finished, click “Save” in the top right hand corner.
Unassign media from your stage
During the process of creating a performance you’ll often end up with more media on your stage than you need. It’s a good idea to unassign any unwanted media in order to minimise the stage load time and make your on-stage toolbars less cluttered.
Unassigning media from a stage does not remove it from the server, it only means that it’s no longer available to use on that particular stage. You can always reassign it to the stage if you decide you do want it after all.
To unassign a media item from a stage:
- Go to the Stage Management interface for your stage.
- Select “Media” in the left-hand menu.
- The right-hand Selected Media list shows all media assigned to this stage. Locate the item(s) you want to remove – it will be covered with a red overlay and a white – sign – and click once. The item will move to the left-hand Available Media column.
- Click “Save” to save your changes.
The media item is no longer assigned to your stage but is still present on the UpStage server.
[New Screengrab]