The Studio is where all the preparation for your cyberformance happens. Here you can create, view and manage your stages, upload and manage media, and edit your profile. If you have Admin permissions, you can also manage others’ profiles, stages and media.
When you are developing a performance, or learning how to use UpStage, it can be helpful to have the Studio open in one browser tab, and your stage open in another tab, so that you can work between both.
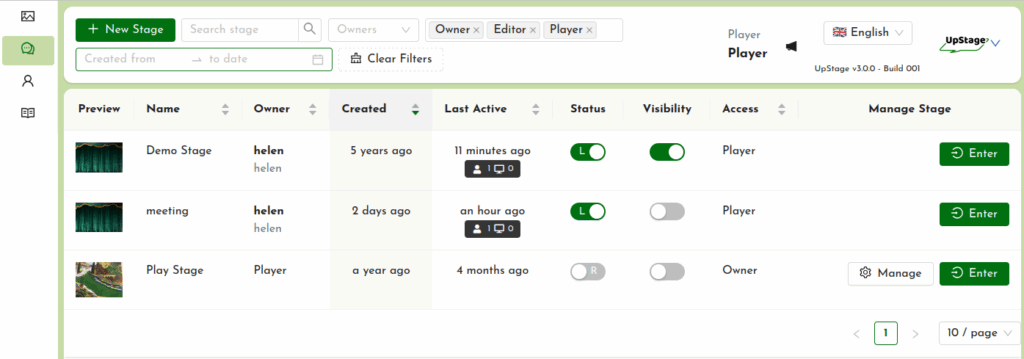
When you log in from the Foyer, you arrive at the “Stages” interface.
The default view shows your stages – this includes the stages you’ve created, as well as any other stages where you have player permissions. To see other stages, click on the x by your player name in the Owner field. A list of all the Stages will then be displayed. If you’re looking for a particular stage you can enter the stage name in the search field.

The stage list displays a thumbnail of the cover image, the name of the stage and owner (usually the player who created the stage, unless they have transferred ownership to another player). This is followed by the date that the stage was created, and the date it was last accessed.
The Status toggle allows you to set your stage to either “Live” or in “Rehearsal” mode. If it is Rehearsal, only the owner and any players who have access to that stage can enter. If it’s Live, the public can enter.
The “Visibility” toggle will show or hide your stage on the UpStage Foyer.
The Access column shows you which level of access you have to a stage:
- Owner: you have created this stage (or another player created it and has transferred ownership to you)
- Editor: you have Player access to the stage and also can edit the stage’s settings in its Stage Management interface
- Player: you can enter the stage as a player, and have access to the on-stage player tools
- Audience: you can enter the stage as audience.
The Manage button brings you to the Stage Management interface for that specific stage. This is explained in the section Manage Your Stage.
To enter a stage, click on the green “Enter” button.